In this tutorial you will find out about the .htaccess file and the power it has to improve your website security.
Creating a .htaccess File
Use TextEdit: open new file and save the file as “.htaccess” in your web folder
Note: please remember that the file .htaccess will be hidden and you will not be able to see it in the Finder. You can show hidden file in Finder following few steps LINK
Block an IP Address or IP range
Insert these information into newly created .htaccess file
# Block access to the file register.php <filesregister.php> order allow,deny allow from 192.168.1.2 #specify an address allow from 192-168.1.0/24 #specify a range </files>
Someone reports that this file should contain
deny from all
However, by defaults, access are denied to all except to the IP allowed
IP Whitelisting with X-Forwarded-For
Sometimes all network traffic (within local network or from the internet) originates from the same source IP (the external IP address of the router). This can be caused by the router software. In this case, htaccess is not able anymore to discriminate local network. In this case “X-Forwarded-For” code works for you. In this example, all the traffic generated by 192.168.1.3, even if with an external IP address, will be allowed to access to the file:
# Block access to register.php
<files register.php>
order allow,deny
SetEnvIf X-Forwarded-For ^192\.168\.1\.3 AllowAccess
Allow from env=AllowAccess # whitelist Your First IP address
allow from 192.168.1.0/24
Satisfy Any
</files>
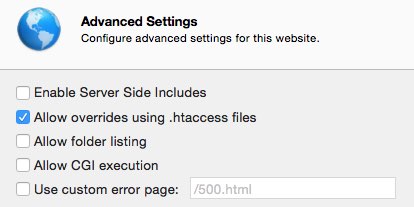
Allow overrides using .htaccess files
If you’re using a mac envinronment, you have to be sure that this setting (Server.app>Sites>Advanced Settings) is enabled in order to make .htaccess works
Cheers

